



Blog

4 Jul
10 Favourite Loose Parts
Posted by Joanna Francis

In our last post, we looked at some of our simplest, cheapest playground elements that fit together to create a unique playground that would fit within a school or pre-school ground. But sometimes, we just don’t have the space to create those kinds of structures or designs. Enter Loose Parts and the plethora of possibilities it brings. Have you read through Playground Ideas’ Loose Parts play manual? This has been one of our most popular resources and provides heaps of ideas for how to create a stimulating play space for kids when you have very little room. We want to share our 10 favourite loose parts for play!

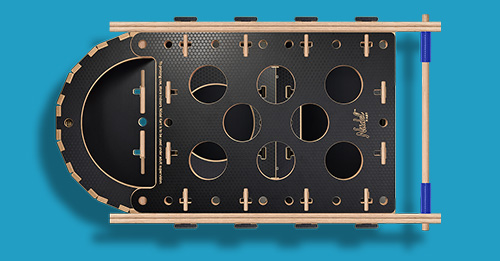
We also recently launched Nüdel Kart, a deconstructable, a loose parts playground that can be reconfigured in endless ways to encourage self-directed learning. It contains research-backed specially selected loose parts materials to stimulate children’s development.
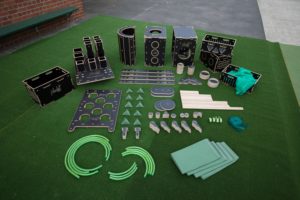
Nüdel Kart exploded

Nüdel Kart has over 200 loose parts play elements
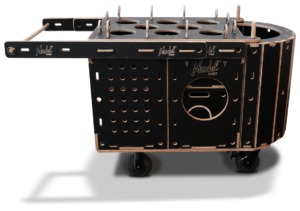
Show the Nüdel Kart packed up

The Nüdel Kart

One of our Global Play Alliance partners Pop Up Adventure Playgrounds, who wrote the Loose Parts play manual, have compiled a list of ten loose parts that every playground should include:

They write:

It’s no secret that we’re big fans of loose parts!  Since 2010 we’ve been encouraging people to forage for play in their own homes and neighbourhoods, so we asked our friends what their favourite loose part was. Nearly 40 responses included all sorts of stories of play in their homes, professional settings, and own childhoods. Some classics are represented, but you’ll also see a number of more idiosyncratic responses. There were so many one-off ‘write-in’ ballots that we had to choose our favourites too! What remains is evidence of children’s endless ingenuity for play, as they make the ordinary things around them extraordinary.

10 Favourite Loose Parts ideas!

1. Cardboard boxes

What child doesn’t love creating a building, a train, a robot, or whatever else their imagination can come up with out of cardboard boxes? The options are endless…

2. Branches, twigs and sticks

Found everywhere and able to be turned into a multitude of creations or purposes.

3. Water

Kids love playing with water, whether it be pouring it into containers, using it to create mud pies or creating tunnels and channels.

(photo credit: Stomping in the Mud)

4. Fabric, cloth

Raid the fabric stash and see what the kids create… capes for superheroes or curtains for their house?

5. Mud

Soil + water = fun.

6. Tires

Many of Playground Ideas’ designs use car or truck tires as their core element, but they are great to use just on their own as well… see how the kids use their imagination to find uses for them!

7. Sand

We’ve said it before, and we’ll say it again…. Every playground should incorporate sand!

8. Natural materials, such as pine cones, shells, seed pods etc.

You can incorporate the collecting of natural materials into the kids play, and then let them turn them into artworks, imaginative play games of shops and markets, or fairy gardens (or indeed whatever else they desire!)

9. Dry leaves

Autumn and kids. Need we say more?

10. Kitchen items.

Anyone with a toddler has no doubt at some point marvelled at their ability to entertain themselves with a bunch of kitchen items from the third drawer! Saucepans, whisks, measuring cups, ladles… kids love to make sounds with them, use them to “bake cakes” or as tools in a sandpit or water tub. The options are endless.

Don’t forget to check out our manual for lots more inspiration on loose parts play.

What are loose parts and why do they work?

Loose Parts is simply a name for stimulating materials that children can use to learn how the world works.  Unlike “normal” playgrounds or most toys, loose parts are open ended and reusable in an infinite number of ways depending on the child’s needs for development.

It is precisely because of their open-endedness that loose parts engage the highest forms of thinking and interaction such as creativity, problem solving, social skills and emotional intelligence.

Loose parts play and tools like the Nüdel Kart support STEM learning through authentic engagement in real world challenges.

They are also excellent for psycho-social support to children from traumatised and disadvantaged backgrounds and can be tailored to the various contexts that it is used in.

Supporting anyone, anywhere to build a stimulating space for play

Please help us to continue creating and sharing free resources, so that you and others all over the world can keep creating awesome play spaces for kids!

If you would like to make a donation, click here!

4 Jul
10 of our Easiest & Cheapest Designs
Posted by Joanna Francis

This year, Playground Ideas turns ten, and we have hit the huge milestone of impacting one million children! To celebrate we will be sharing with you over the coming weeks some of our favourite designs and resources to help you create your own dream DIY playground, and will be encouraging you to donate $10 (or more!) to Playground Ideas so that we can continue to create and share free resources that anyone anywhere in the world can access.

To kick off our celebrations, we want to share with you 10 of our easiest and cheapest designs, all of them virtually indestructible. If you’re thinking about creating your own DIY playground using locally found and recycled materials, here’s the place to start! You can use these elements individually of course, but these 10 designs all go well together to create the ideal first playground for a novice builder. Each of these elements can be found with detailed step-by-step instructions on our website. Just create a free account and off you go!

1. Brick shops. Over the yen years of our existence, shops have been one of our most commonly built elements in playgrounds and are such a great way to get kids involved in imaginative play. In the past we built them out of timber but have found that wood sitting in the ground in many of the places we worked just wasn’t strong enough. So this super simple design takes the same idea and makes it virtually indestructible and gives you a great surface to paint shop fronts on or create chalkboards for kids to develop their own designs. There’s no reason you couldn’t create a steel or timber rooftop too. Or even a whole shop or cubby in the back. These work great in an environment where there’s a sandpit, leaves and sticks, loose parts or clay so that the kids can make their own money and goods to use with the shops.

2. Motorbikes. Our motorbikes are probably our most built element around the world. The idea originated out of a chair design which looked like such an awesome motorbike that we couldn’t help ourselves. This design really fits the bill in terms of being cheap, easy and indestructible. In most places you can find a few tires, a stick for a handlebar and then all you need are some bolts and you’re done. You can get as creative and crazy as you like with the painting! Here’s a couple of examples…

3. Half tire square. There is really no excuse not to build this element. There is no place we’ve ever been where we couldn’t find a few truck tires and a hoe or shovel. There’s no drilling, no bolting, and it can be as big or as small as you like. So why not build one today!

4. Hammock swings. Kids love these swings. Hanging under a cubby house or in the shade, one or two children will love the feeling of them, and they’re fantastic for kids who may be on the autism spectrum and need a gentle squeeze and subtle rocking motion to calm them down. If you’ve got a few of these lined up next to each other they can also be used as swinging ‘stepping stones’ for more boisterous active play. All you need is a sharp knife and a nylon reinforced truck tire (steel reinforced truck tires are great for many of our other elements but not this one) and you’re away.

5. Sandpit. If you interviewed every child in the world, building a sand castle may well just top the list of the best play activity. And we think that every playground should have a sandpit. The ability to build and construct their own world is really important and sand is the perfect medium for it. We offer lots of options for sandpits on our site but this one basically involves plonking down a few tires in any shape you like, placing down some plastic sheeting and throwing in some sand. If you’ve got a sharp knife and you want to be fancy, cutting the top side walls off the tires is a great way to create individual little sandpits for children to build in on their own.

6. Earth mound. Possibly the most prehistoric play thing and the simplest. One earth mound is great, many earth mounds are better. Kids can run and jump on them, they’re great for wheeled toys, are super low maintenance and last for ages. And they are the perfect accompaniment to tile slides, climbing frames and stepping stones.

7. Basket swing. Basket swings are our bigger newcomer. They’re great for little kids and anyone that has trouble sitting up on their own or holding on. It’s a true all abilities element, and you can put them in in any direction. They just can’t fall out! (unlike most swings in Western countries). They’re big enough for two kids and they can be hung from one point so they can swing in any direction, or from 2 points so you get a back and forth motion. Stay tuned for this to be up on our design library soon!

8. Empire pyramid. Drilling and bolting our original truck tire pyramids is not for the faint hearted. But the empire pyramid uses mostly side wall to side wall connections which makes them much easier to drill and reduces the cost of the bolts. For a 6 tire pyramid it also reduces the height a little, as for smaller children, climbing up a large truck tire is a little too challenging. We love building more than one of these in a cluster together and adding ropes or wooden planks between them.

9. Tire tunnel. Children have a primal urge to hide in caves or small spaces and seeing as caves may be hard to come by in your school, this is the perfect alternative! They’re also soft and springy like a trampoline on top. One tip: The amount of side wall you cut off will impact the tunnel’s ‘squishy-ness’ so you can decide how strong or trampoline-y to make it. These can be buried in the ground, or even better, can be left as elements that can be rolled around and used in different ways.

10. Bamboo grove and circle with sensory garden. Last century, playgrounds went through a very sad period of stark, industrialism but thank goodness for all of our sakes and for the ladybirds, nature is back with a vengeance. Children need green and these elements make it easy to bring the nature to their noses. Simply fill tires with soil and plant in some local shrubs or flowers, or why not even herbs and vegetables?

Please help us to continue creating and sharing free resources, so that you and others all over the world can keep creating awesome play spaces for kids!

[Donate button]

23 Jun
Recycled Playgrounds from Around the World
Posted by Elizabeth Moreno

10 (1)

Playground Ideas has partnered with communities, individuals, and organizations in over 85 countries to build playgrounds from local materials, tools, and skills. In many of the communities where our play partners work, manufactured playground equipment cannot be sourced locally or is extremely expensive. We’ve had the privilege of working with tremendously talented designers, builders, and makers who have transformed recycled materials into amazing spaces for play. Check out a few of our favorite recycled playgrounds from around the world:

Papua New Guinea – Playground Ideas partnered with a local school to build this recycled playground, which utilized many used tires. These giant swings were made from cut up truck tires and tread and can accommodate many children at once. Check out more photos of the Papua New Guinea playground. 

1

Guatemala – Global Play Alliance partner Ancris Cabezas built this amazing recycled playground to look like a giant T-Rex. The kids even came up with the design themselves! Check out this video of how they brought their dream to life.

2

Check out this video of how they brought their dream to life:

Mexico – Global Play Alliance partner Rise-Now built this recycled playground tire dragon on a site in Mexico. The design was inspired by legendary playground builder Jimmy Jolley. 

3

Vietnam – Global Play Alliance parter Think Playgrounds constructed this recycled playground using recycled wooden pallets. 

5

Kenya – We partnered with a local primary school in Kenya to build a recycled playground which featured a giant see-saw aeroplane! Get the DIY plans to build your own recycled aeroplane playground element. 

4

Ready to build a recycled playground in your community? Click here to sign up for a free Playground Ideas account and you’ll get access to over 150 DIY playground designs, a library of how-to handbooks, and our 3D Drag & Drop design tool.

Recycled Playgrounds from Around the World
1 Jun
Playground Painting: Tips from East African Playgrounds
Posted by Elizabeth Moreno

East African Playgrounds, a member of Playground Ideas’ Global Play Alliance, is a playground building nonprofit in Uganda that works to improve the lives of children in East Africa by developing children’s learning opportunities, creativity and environments through building playgrounds and running arts and play sessions. In addition, East African Playgrounds provides high quality training and local employment through their playground building workshops.

11896312_618008551634924_6661743027987036120_o

One aspect of East African Playgrounds’ work that really shines through is their commitment to durable, long-lasting play spaces. Working with the materials available locally, East African Playgrounds has spent years testing and developing build procedures that ensure their playgrounds will last for years to come. They’re constantly revisiting their past build sites to make improvements and learn from how their playgrounds hold up over time.

A part of the build process they’ve perfected over time is paint quality. A poorly painted playground can quickly chip and fade and it’s a problem many local playground builder’s around the world face. As we often get questions about proper playground painting, we asked East African Playgrounds to share their expert tips:


Painting your playground – Tips from East African Playgrounds

There are two main benefits of painting your playground;

1. It protects the metal, and prolongs the life of the playground.

2. It looks awesome.

Paint can never ever be guaranteed, there are too many variables from children hitting the playground with rocks to the sand on their hands and feet acting as sandpaper and removing the paint, but there are things you can do to prolong the life of the paint.

15002503_817485718353872_3747115164440037727_o

Preparation

Preparation is the most important part of painting your playground. Metal which is supplied normally comes with an oil based coating, this protects the metal from rusting but it also restricts the paint from fully binding with the surface of the metal.

Remove all grease from metal – To do this East African Playgrounds uses a rough sandpaper (P60), Soap Powder and Water.

Create a rough surface on the metal – Once we have removed the grease and dried the metal, we use Sandpaper (P120) to create a rough surface on the metal this helps the undercoat bond with the surface of the metal.

11880322_619674501468329_1215582501053873058_n

Painting

The paint that you use is also very important to prolonging the life of the paint on the playground. East African Playgrounds uses specialist metallic vehicle paint which is produced for using on metal. Cost wise it is more expensive but you will see better results.

– Undercoat – We apply two coats of undercoat to all our metal with a drying time of 48 hours between coats. This allows each coat to be fully set before applying the next coat.

– Sanding – Once both layers of undercoat have dried for 48 hours, we prepare the undercoat for a colour coat by using a wet sandpaper (P280 – Black in colour)

– Colour Paint – We apply one coat of colour paint to our playgrounds. Once again allow 36 – 48 hours drying time.

– Clear Paint – After the colour paint has been allowed the allocated drying time we apply a clear coat of paint. This gives the playground one extra layer of protection whiles also giving it a nice shiny finish.

We suggest that playgrounds are then unused for a further 7 days to give the paint 100% the time it needs to dry. This obviously isn’t easy when there are eager children wanting to play.

Time, patience and high quality are key for the paint to last on your playground.

11919540_619389288163517_3334703980286371870_n

Paint Products East African Playgrounds uses in Uganda:

Undercoat – We use a two-part undercoat, where the paint is mixed with both hardener and thinner. Two-part paint sets the paint quicker and gives a tougher finish.

Sadolin UPOX Zinc Phosphate

Sadolin UPOX Thinner

Sadolin UPOX Hardener

Colour/Clear Paint – Once again, we use a two-part colour and clear coat.

Sadolin Sadocryl

Sadolin Sadocryl Hardener

Sadolin Sadocryl Thinner

TIP:

We have also recently started spray painting our playgrounds. Painting time is relatively similar but the finish is 100 times better.


Thanks for the painting tips, East African Playgrounds! Be sure to check out more photos of their beautifully painted playgrounds on the EAP facebook page.